Before you pay a small fortune to have a professional build a real estate website for you (or pay a “reasonable” monthly subscription fee that ends up costing you a sizable fortune!), consider building it yourself.
Most agents don’t think they can build a real estate website of their own. It sounds too technical and most of us just don’t have any experience with this stuff. But I’m telling you, if I can build a real estate website, so can you! I have zero technical experience, and I’m not honestly all that interested in tech. But, between my businesses and my clients’ businesses, I’ve built about a dozen websites now. With today’s tools, you are absolutely capable of building your own website. You just need to know how to navigate the process.
This page will show you how to build a real estate website, step-by-step. I’ll share my secrets for getting the best service providers at the best rates, saving time by using customizable professional design templates, and handling all the technical details.
And this guide is totally free.
You should know up front that I receive a small commission from some of these companies if you use my links to purchase their products. This doesn’t cost you anything extra. In fact, some of these companies let me offer special deals through these links, so you can actually get a better rate than if you just used Google to find their websites.
These links are called affiliate links, and this is one of the ways I make money so I can continue providing so much free information on my website. It’s a win, win, win. You get easy access to the best resources I can find, I earn a commission on products I truly believe in, and the company makes a sale!
Oh, and there’s a fourth winner: 10% of all profits are proudly donated to not-for-profit organizations that support financial literacy for children. Because they are your future buyers and sellers, and we want to provide them with a financial education! Click with confidence knowing that I stand behind these recommended resources, and you are contributing to a good cause.
By the way, if you want to learn more about how you can make money with your own affiliate links once your website is up and running, check out my blog post, How to Make Money Blogging About Real Estate.
But before you build a real estate website, let’s cover a couple basics.
Before You Build a Real Estate Website…
I know you’re busy, so we’ll keep this intro short. Let’s just go over a few quick notes about what you can expect from this Guide, how much your website will cost, how long it will take to build, and where you can find additional support if you need it.
What you will get from this Guide
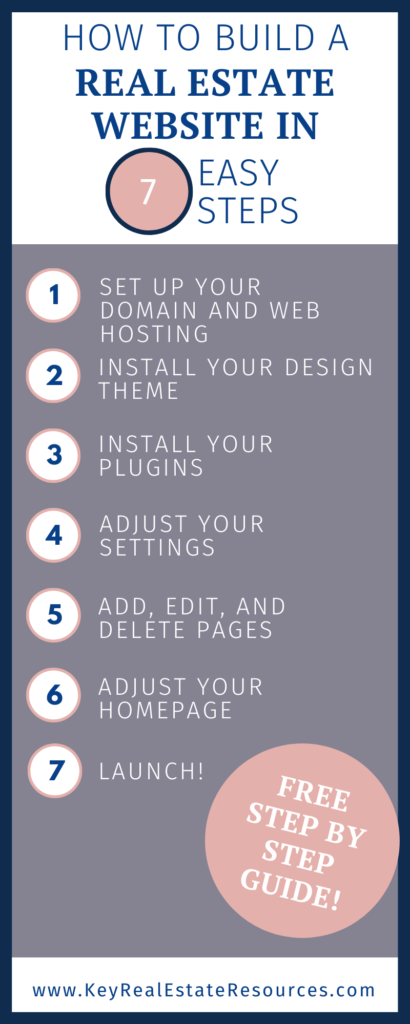
If you follow this Guide start-to-finish, you’ll end up with a professional website that includes everything you need to present your brand to the world:
- A domain name (your web address)
- Web hosting services (required to give your website a virtual space to occupy)
- Content management services (to handle all the verbiage and images you’ll post on your site)
- A modern-design theme (to present a professional image)
- Plugins (to add features and functions to your website)
- A homepage
- An about page
- A contact me page
- A properties page
- A blog page

Once you’ve completed this Guide, you’ll be able to maintain and update your site on your own, including items like:
- Custom images, text, colors, and fonts
- Blog posts for your blog page
- Property listings for your property pages
- Ads, affiliate links, and e-commerce capabilities. If you’re interested in taking your site from simple lead-generator to independent income stream, please contact me via email at michelle@keyrealestateresources.com. I’m looking for anyone interested in joining a Beta Group to test my new guide-in-development, which is all about monetizing your website.
Regarding MLS search functions
Your site will be designed to work with IDX to offer full MLS searches on your website if you choose to offer that feature. However, you would need to activate a separate plugin and pay a subscription fee (typically starting at $39/month) to access the MLS data, plus a monthly fee to your local MLS provider for allowing you to use their data. In my opinion, this is an unnecessary expense and a hassle for most Realtors®. Buyers are highly unlikely to use an agent’s site to search for properties. Even if you offer searches, buyers will probably go straight to Zillow, Redfin, Trulia, or Realtor.com.
Your website doesn’t need to offer full MLS searches. Focus your efforts on using your site to demonstrate your authority in the local market, provide engaging content for your readers, and promote your services.
How Much Should I Expect to Pay for a Complete, Professional Website?
You can build a real estate website for under $250, which includes web hosting for 3 years!
The package of providers I recommend is:
Web hosting through Bluehost: Under $10/mo. Just understand that you’ll pay for your entire term upfront. You’ll pay once for 12 or 36 months of hosting.
A design theme from WP Residence: $59. This is a one-time fee that covers your use of the design forever.
Content Management through WordPress: FREE!
A domain name through Bluehost: FREE for the first year! $15.99/year after if you continue to use Bluehost for your domain name.
How Long Will It Take to Build a Real Estate Website?
The amount of time it takes to build a real estate website really depends on you. There are lots of potential rabbit holes in website building; you can spend hours researching providers, design themes, and layouts. But if you’re anxious to get your site launched quickly, and you’re willing to take my recommendations for providers and design themes, you can complete your website in under two hours. I offer lots of shortcuts in this Guide to help you launch as quickly as possible. You can always revisit certain elements later.
What if I Get Stuck?
Every effort has been made to make sure this Guide accurately walks you through each step of the process. I personally used this guide to launch a website of my own only weeks before publishing, so the information would be as up-to-date as possible.
Of course technology is constantly changing. You may find that some screens look a little different from the screen grabs in this Guide. In 99.9% of cases, these minor appearance changes won’t have any effect on your ability to create your website using this Guide.
But in the rare case that you notice a material difference, where any step of the process isn’t aligning with the bullet points in this Guide, I would really appreciate it if you could let me know. That way I can make a revision to help everyone working through this in the future.
One of the best things about the service providers recommended in this Guide is their customer support. Let’s face it, technology doesn’t always work as expected. And building your own website can be tricky (which is why so many people pay developers thousands of dollars to build a real estate website)! But with the online support offered by these providers, I was able to build multiple websites with no prior experience. And you can too!
One of the most frustrating things about creating your own website is that you have to rely on technology and programming code created by other people. And they may not always work seamlessly. Especially as you combine code from your web host with code from your design theme. If you run into any trouble, don’t hesitate to contact your providers with questions. I’ve contacted each of them at least once in the 5 years I’ve been building sites for real estate agents, and they have always been friendly and helpful!
While I certainly don’t expect you to run into issues, please understand that it is a possibility. I can at least assure you that your struggle will be worth it once your business benefits from having its own website!
Ok, enough preamble. Let’s get started!
Step 1: Register Your Domain Name and Set up Your Web Hosting
In this step, we’ll register your domain name, set up your web hosting, install your content management system, and connect your first plugin. It sounds like a lot, but it should just take about 15 minutes.
Let’s quickly define “domain name” and “web hosting” in case you’re not familiar with these terms. Your Domain Name is basically just your website address (your “.com” location). And web hosting is sort of like leasing virtual land. You’re essentially paying for a vacant space on which to build your website.
You can set your domain name and web hosting through different providers, but I highly recommend Bluehost for both.
I use Bluehost for all of my current websites. Here’s why:
- A free domain name for a year (after that, the cost is under $20 per year).
- Affordability. The monthly cost of service could be less than a fancy coffee.
- Ease of use. I am tech-challenged, and I was able to figure it out. I can’t say the same for the other web hosting providers I’ve tried.
- Reliability. While some hosts struggle to provide continuous connection, none of my Bluehost sites have ever experienced downtime because of unreliable connections.
- One-click WordPress installation. You’ll want WordPress to manage all the content on your site, and Bluehost makes it really easy to install.
- Exceptional customer service. You can actually get a human on the phone if you need them.
- Free security certificate. Security certificates have become a necessity, and unlike other providers, Bluehost includes it in your package.
Of course you can use any provider you’d like, but I’ve found Bluehost to be the best provider on the market. So this section will walk you through the Bluehost setup specifically (though the process will be similar with other providers).

- Go to Bluehost.com.
- Click “Start Building” in the Website Builder box on the right-hand side.

- Select your package. I recommend starting with the “Basic” package since you can always upgrade later. But if you know you’re going to allow IDX searches and client log-ins immediately, “Pro” might make more sense for you. You have the option to choose 12 or 36 months.
- Enter the domain name you want in the “Create a New Domain” box.
- Your domain name must be unique.
- For most realtors, your name is the best way to brand yourself. Your name is easy to remember, it’s not tied to a company (so it can evolve with your career), and it’s (possibly!) somewhat unique. If your name is already taken, try combining your name with “real estate”, “properties”, “homes”, etc.
- Examples: GundersonProperties.com, AshleyMatthewsRealEstate.com, HomesByJulianna.com
- To present a professional image, you need a “.com” domain (as opposed to a .biz or .org).
- Enter your Account Information as directed.
- For Package Information:
- Choosing the 36-month plan will give you the best price.
- I recommend unchecking everything; none of the optional extras are necessary.
- Quick note regarding Domain Privacy Protection: If this box is not checked, the phone number and email address you entered in your Account Information will be available to groups of web designers that pay for that information. So you’ll receive many emails and a few phone calls over the next month or so. Probably 10 emails every day for 2-3 weeks after setting up your site. If that would really bother you, you can pay $0.99/month for the privacy protection, but for $36, I’m happy to delete a few emails and decline a few phone calls.
- Enter your payment information. Check the box to indicate you read the Terms of Service, then click “Submit”.
- You’ll see a Congratulations page once your payment has been processed. There may also be an ad for an upgrade. You can just click “No Thanks” to move on.
Your Domain Name and Web Hosting are active! Now let’s set them up.
The Bluehost Wizard will walk you through each of these steps. Simply follow the prompts as they come up.
Here are a few helpful tips for making smart choices on your setup:
- Your password should be complex (including at least one: upper-case letter, lower-case letter, number, and symbol), but memorable.
- If a “Pick a Theme” prompt pops up, just click “Skip This Step”. We’ll take care of it in a bit.
- Bluehost will automatically set up WordPress for you (WordPress is your content management system and it’s totally free!).
- Your site title can simply be your domain name, but with spaces. For example, “Gunderson Properties” would be a perfect title for www.gundersonproperties.com.
- Your site description can be your tagline (something like “proudly serving North County” or “helping San Diegans buy and sell real since 2002”). This can always be changed later.
- Select “Yes” when asked if you want a blog (because you want WordPress to create a news/blog page for you even if you don’t use it right away).
- Choose “A Static Welcome Page”.
- Select “Yes” for a starter Contact Us page if offered.
- You’ll have the option to create a Jetpack account (your first plugin!), which I recommend. Jetpack provides useful analytical tools.
- If you’re asked to install Woo Commerce, click “Not Now” (you may want to add it later if you decide to sell products from your site, but for now, it would just muddy the process).
At this point, your site is active online!
But it’s just showing a “coming soon” page. After we’ve completed the setup, we’ll officially launch your real estate website.
Step 2: Install Your Design Theme
In this step, we’ll purchase, install, activate, and validate your new design theme. When you build a real estate website, you can literally spend days researching design themes. Once you decide on a theme, it should only take about 15-20 minutes to purchase, install, activate, and validate.
But wait, what exactly is a design theme?
Your design theme is your website blueprint. It details where everything on your site will go and how it will all be structured. What will your standard font be? Will you have an image in your page headers? Will you have a menu at the bottom of your home page? All of these tiny details are handled by your design theme.
I’ve searched hundreds of design themes, and there’s only one I can fully recommend for all real estate professionals: WP Residence.
Here’s why:
- Flexibility. 1,000 agents can all have the WP Residence design theme, and all thousand sites can look completely different. The theme looks great as-is (out-of-the-box so to speak), or you can adjust the many, many settings until you have a completely customized website. To show how versatile this theme is, I’m currently using the WP Residence design theme for this website.
- Track record. WP Residence has nearly 11,000 downloads and 1,000 ratings, with a 4.76-star average. This theme has been tried and tested. All the kinks have long been worked out.
- Affordability. This is one of the most robust themes I’ve found, but you can buy the license to use it forever for just a one-time fee of $59.
- Features and functionality. I said the theme is robust, and I meant it. You can do so much with this site, including advanced property searches, floor plans, user log-ins, and even payment collection systems. As a newbie, this will have way more features than you need, but as your practice grows, you’ll be glad these options are ready and waiting for you.
- Responsiveness. WP Residence won’t take forever to load, and it will look great no matter what device your clients and prospects use to view your site.
- Mobile-readiness. Your site will automatically be formatted to look great on devices of all sizes: phone, tablets, and computers, WP Residence has you covered!
 If you decide to use a different theme, your purchase, installation, and activation process might be a little different but should follow the same basic structure. Here are the steps for anyone using WP Residence:
- Open a new browser window and go to Theme Forest WP Residence.
- Click “Add to Cart” and complete the checkout process.
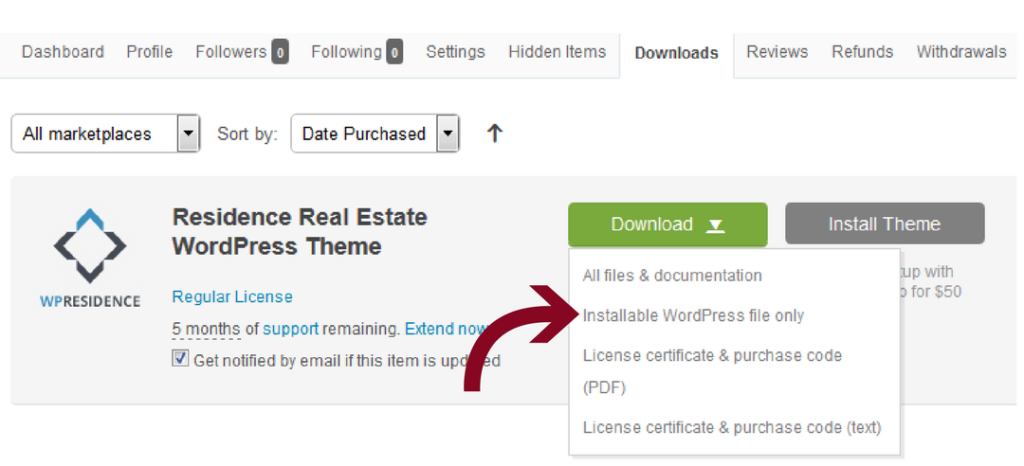
- Once you’ve paid for your purchase, you’ll see a green download button. Click that and select the “installable WordPress file only”. (No need to pay $50 for the install; I’ll show you how to do it yourself).
 Congratulations, you’re the proud owner of a WP Residence Design Theme! Now let’s install and activate it. This takes a few steps, but saves you $50 😉
- Keep your Envato Market page open, but go back to your WordPress page.
- Click “Appearance” on the left-hand toolbar, then “Themes”.
- Click on “Upload Theme”.
- Choose the installable WordPress file that you downloaded from Themeforest (it ends in .zip). If you accidentally downloaded all files and documentation, just go back to ThemeForest and download the “installable WordPress file only”. Click “Install Now” and wait.
- Once you see “Theme Installed Successfully”, click “Activate”.
Your theme is now installed and activated! Now we just need to verify the purchase on your new site.
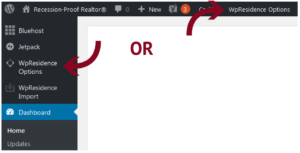
- When the page refreshes, you’ll likely see “WpResidence Options” toward the top of the left-hand toolbar and in the top toolbar. They both go to the same place, so you can click either.
- Jump back to your Envato Market page. Go to your profile icon in the upper right corner, then click on “Downloads”.
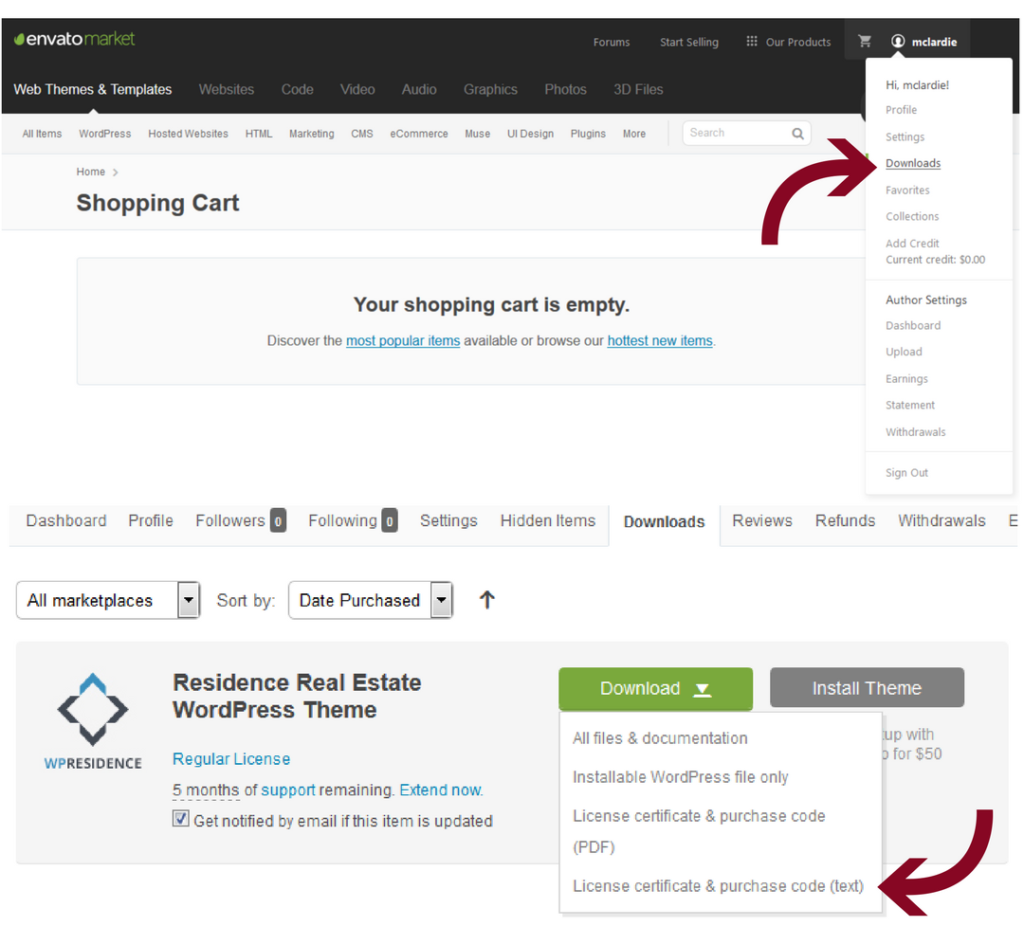
- Click the green “Download” button and select “License certificate & purchase code (text)”
- Open the downloaded text file. Find the “Item Purchase Code” (a long stream of numbers, letters, and hyphens), and copy it.
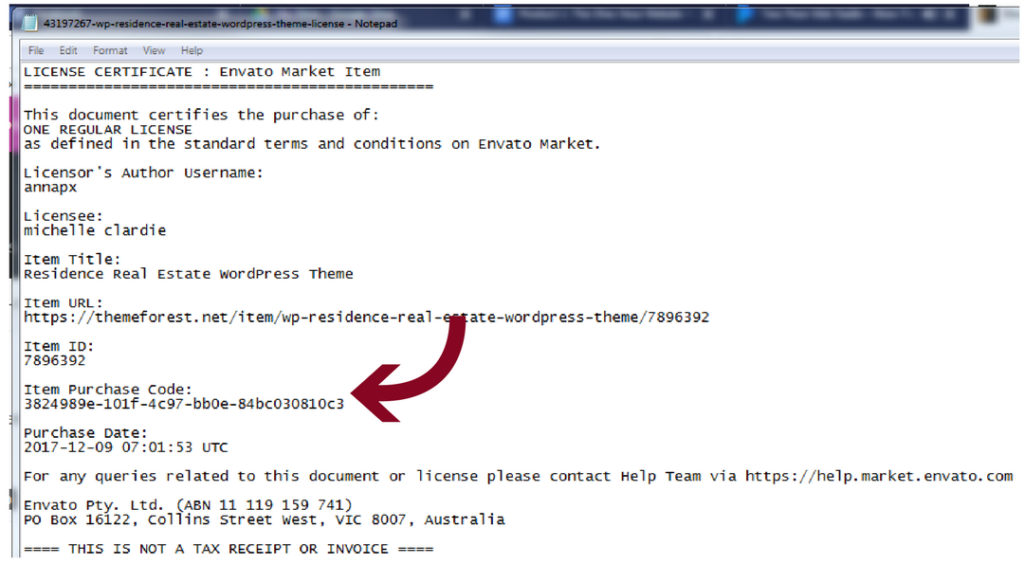
- Go back to your WordPress page. You’ll see a blue box asking you to “activate the theme in the next 24h to validate the purchase.” Paste your purchase code in that box and click “Check License”. You should then see a message saying “Your copy of the theme is activated”.
Your Design Theme has been installed, activated, and verified!
From here on, most of your work will take place in WordPress. It looks intimidating at first because it’s a lot of menus and not the drag and drop design screen you often see on website building advertisements. You’ll see a long toolbar running down the left-hand side of your screen, and another short toolbar running across the top. These menus give you access to everything on your site. And don’t worry; you’ll get used to them soon enough 🙂
Step 3: Install Your Plugins
Before we can start editing your website design, we need to install a few plugins.
What are plugins?
Plugins are little bits of code you can upload to your WordPress site to add functions and features. They make your life easier.
Plugins are divided into 3 categories:
- Those suggested at install (or automatically installed for you during install).
- Those related specifically to your design theme.
- Miscellaneous other plugins I use and recommend.
One last note: some plugins require “API Codes” or “API Keys” (API stands for Application Programming Interface). These codes/keys link your website to your account with the plugin provider. For example, if you want to use the Akismet spam protector plugin, you’ll need to sign up for an Akismet account. Then Akismet will provide an API code for you to paste into your WordPress account so they can link your website to your Akismet account.
But there are hundreds of thousands of plugins to choose from. How do you know which few you need?
Don’t worry, we’ll go over the plugins I recommend for new real estate agent sites. Let’s go through them now, category-by-category.
Plugins Suggested at Instal
If you purchased your web hosting through Bluehost, the Bluehost plugin will be automatically installed for you, so you don’t need to manually do anything. Here’s a quick look at those plugins and what they do for you.
OptinMonster
The OptinMonster plugin will also be automatically installed, but to actually use it, you would need to create an OptinMonster account. OptinMonster helps you create those pop-ups and forms to collect subscriber email addresses. While you definitely want to collect email addresses from readers, you don’t need to pay for this service as a newbie. There is a free alternative (which I’ll cover in a bit). So I do not recommend using this plugin unless you have already decided that OptinMonster is the best service for you. Having the plugin on your site won’t hurt anything, so you can just ignore this.
The rest of the plugins in this section are recommended by WordPress as you set up your account. You don’t have to install them, but if you decide to, you’ll simply click on the prompt in WordPress.
Akismet
I personally use and recommend. Akismet protects your site from spam. You will need to sign up for a separate Akismet account and get an API key to paste into WordPress. In the interest of time, you might want to save this step until after your site is launched. Totally up to you.
Jetpack
I personally use and recommend. Jetpack is built to generally make your WordPress run more smoothly. It includes tons of features like providing site statistics, backing up your data, and allowing you to post to your blog via email when you’re on the go.
Constant Contact
Constant Contact is an email management plugin, allowing you to send pretty emails automatically. I don’t use it because I don’t want to pay $45-$95/month when there is a free option (which I’ll cover soon).
Theme-Related Plugins
If you’re using the recommended WP Residence Design theme, you’ll be prompted to install several plugins after installing the design theme. They are all essential to the functionality of your design theme, so I recommend installing all of them. These include:
- Envato Market
- WPBakery Visual Composer
- EWWW Image Optimizer
- Revolution Slider
- Ultimate Addons for Visual Composer
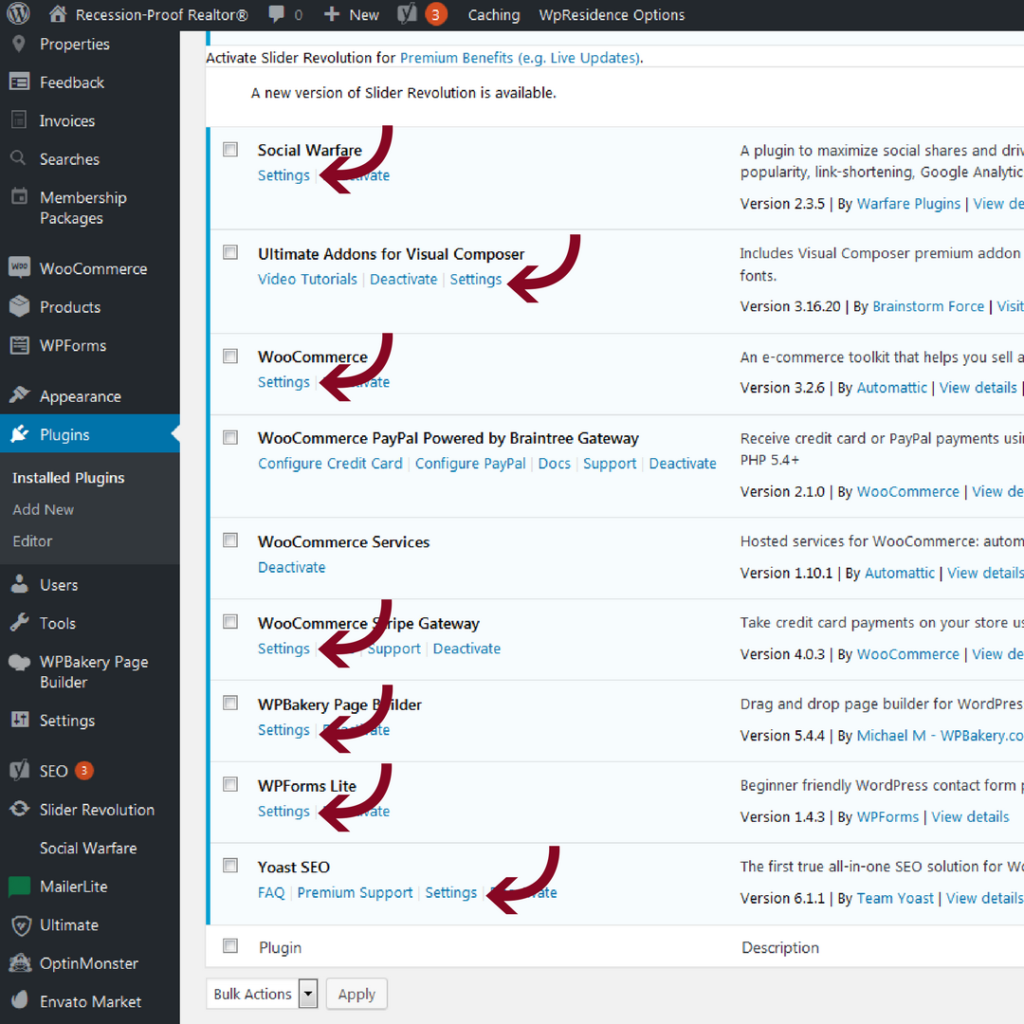
You should see prompts similar to this for each of these plugins:
 If, for any reason, you don’t see any prompts to install and activate these, you can find all of them manually using the 3-step process found in the next section.
Lastly, if you’re using a different design theme, different/additional plugins may be suggested. I recommend installing the plugins suggested for your theme as long as they are free.
Other Miscellaneous Plugins
In addition to the plugins suggested by WordPress and those required by your WP Residence Theme, I recommend installing the following plugins manually. Again, all plugins can be installed manually, so if you have any trouble with the WordPress prompts for the plugins listed so far, you can easily install them manually.
There’s a simple 3-step process for installing and activating these plugins:
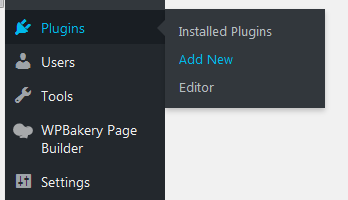
- Find the plugin
- Navigate to “Plugins” on the left-side toolbar in WordPress
- Click “Add New”
-
-
- Type the plugin name in the “Search Plugins” search bar
-

- Install the plugin by clicking “Install Now” on your selected plugin
- Activate the plugin by clicking “Activate” on your selected plugin
That’s it! So here are the few plugins I use on my sites and recommend for real estate agents.
Social Warfare
Social Warfare makes it easy for your audience to share your posts. It provides the social media share buttons for all your posts. And the standard package is completely free!
If you’re interested in the pro package, which I only recommend after using the free standard package for several months, it’s just $29/year (less than 2.50/month!).
The Pro Package adds:
- Full Button Customization
- Auto Pinterest Share To Images
- Customizable Click To Tweet
- Twitter Cards
- Minimum Share Count
- Analytics
Yoast SEO
Yoast SEO helps search engines find and catalog your site so more people can find you online. It will even guide you to improve your SEO (Search Engine Optimization) as you write blog posts, suggesting things like “use your keyword in a subheading” or “add images with your keyword in the alt tag”. This plugin is essential for anyone new to SEO.
MailerLite
MailerLite is a great all-in-one alternative to OptinMonster and Constant Contact. It allows you to create forms to collect subscriber email addresses and create automatic email campaigns for them.
For example: if you entered your email address on this site, you used a form I designed with MailerLite, then you received an automatic email I created and automated in MailerLite, welcoming you to the community.
The best part: MailerLite is free up to 1,000 email addresses. Once you go over 1,000, pricing depends on your number of subscribers. It’s as little as $10/month for 1,001 to 2,500 email addresses.
You can install this plugin now, but you don’t need to worry about creating forms or email campaigns at this point. That can all be added post-launch.
Classic Editor
In 2019, WordPress switched to the “Gutenberg Editor” instead of the classic editor (your editor is like a word processor where you build your web pages and blog posts). The Gutenberg Editor uses “blocks” instead of simply putting everything in one chunk. Blocks could be headers, paragraphs, images, etc. I hate the Gutenberg Editor. I often write my posts offline and copy/paste into WordPress when I’m ready to post, and the Gutenberg Editor makes this copy/paste so much harder than it needs to be. So I installed the Classic Editor plugin on all my sites.
It’s a personal preference thing; you might really like the Gutenberg Editor. But if you find yourself getting annoyed when trying to write new pages or blog posts, install the Classic Editor plugin to make your life easier.
These plugins will give your website a solid start. Once you’re up and running, you might want to consider adding a few more. I’ll list a few more options in your Post-Launch To-Do List at the end of this post.
Congratulations on installing and activating your starter plugins!
Step 4: Adjust Your Settings
When you build a real estate website, you can accidentally spend way too much time adjusting settings. Settings are incredibly complex because everything has its own settings. Settings control every detail on your website. You’ll have separate settings for WordPress, your design theme, and each one of your plugins. But that’s not all. You’ll also need to activate a layout and adjust your menus.
That’s the bad news. The good news is that many of the default settings are just fine as-is. And more good news: adjusting the settings that need to be adjusted (and double-checking on some important settings) will only take about 30 minutes.
Activate a Demo Layout
To create an instant website layout with a visually appealing home page, and coordinated property and blog pages, you can choose from WpResidence’s importable demos (obviously, if you have a different design theme, your layout options will be different; the activation process should be similar).
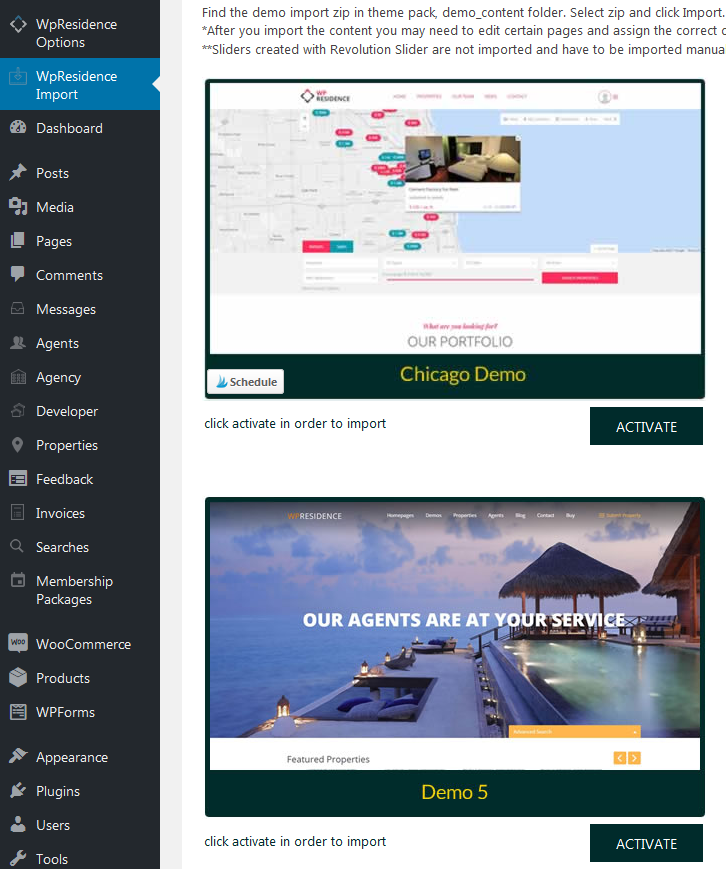
Click on “WpResidence Import” on the left-hand toolbar to see the importable demo options. If you want to see working website demonstrations of each demo before you activate one, head to http://demo.wpresidence.net/#demosresidence, and click on the demos that interest you. Note: you can always change the fonts, colors, and images, so focus on which layout you like best.
Click “Activate” on your demo of choice (screenshot on the next page).
You can change your demo later, but it can be a hassle, so select the demo you’re most likely to stick with.
If you have trouble installing a demo, there may be a simple execution time incompatibility between your chosen demo and your Bluehost settings. I’ve never encountered this, but I know it can happen. If you run into this, just contact Bluehost support. They can change the code on your web hosting file to allow the import of your chosen demo.
With your layout chosen, you probably want to see how your site looks. Simply right-click the little home icon in the top toolbar and select “open in a new tab” or “open in a new window” to view your site. Some of the settings in this section will adjust the appearance of your site, and you can always refresh this page (and click around it like a live website) to see how those adjustments look on your site.
Adjust Your Settings
Now you can start adjusting individual settings.
I recommend taking time to get to know all the different setting options, but in the interest of helping you learn your way around these settings, I’m going to give you a quick-start cheat-sheet to cover the most important settings you need to either confirm or adjust.
WordPress Settings
The WordPress Settings are all located in the “Settings” section of the left-hand toolbar.
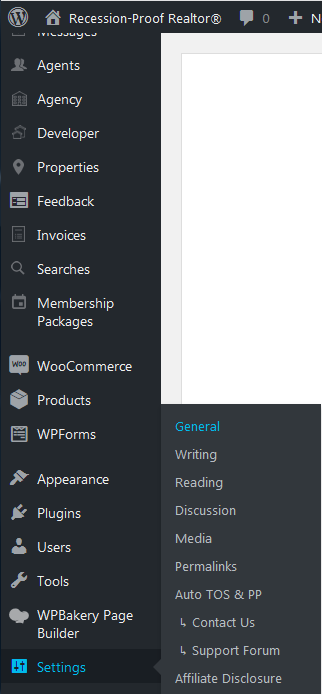 Side note: this screenshot is from my site which has more plugins. Your toolbar will look a little different, but you’ll still be able to find “Settings”.
General
Site Title: Enter your site title. It’s common practice to simply re-write your domain name with appropriate spaces and capitalization (example: the domain sharoncasselrealestate.com would have the site title Sharon Cassel Real Estate).
Tagline: Enter your personal brand tagline. (example: Call Patrick and Start Packing!).
Membership: Check the “Anyone can register” box to allow your clients to register on your site.
New User Default Role: Select “Subscriber”.
Bluehost Auto Update Manager: Make sure Themes, Plugins, and Translations are all “on”.
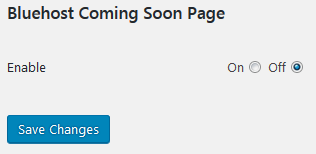
Bluehost Coming Soon Page: This will be enabled until you turn it off. That way the public won’t be able to see your site as you work. Keep this off until you’re ready to launch your new site. We’ll turn it off together when you’re ready to launch.
Always click “Save Changes” before moving to a new page.
Writing
No settings need to be adjusted. This is where you can set up your account to allow you to create blog posts by email if you’re interested.
Reading
Your homepage displays: Check “a static page” to make sure your clients land on your homepage when they enter your domain name. “Homepage” should be set to “Home”, and “Posts page” should be set to “Blog”.
Blog pages to show at most: 10 is good. It shows a good bit of your work on page 1 of your posts without being overwhelming.
Syndication feeds show the most recent: Again, 10 is good.
For each article in feed, show: Check “Summary”.
Search Engine Visibility: Never check the box. Make sure the box is unchecked so search engines can find your content.
Follower Settings: The follower settings verbiage is fine as-is, but you can always inject more personality if you’d like.
Discussion
Default article settings: Make sure all boxes are checked.
Other comment settings: Check “Comment author must fill our name and email” and “Enable threaded (nested) comments [5] levels deep”. The other boxes should remain unchecked.
Email me whenever: Make sure both boxes are checked.
Before a comment appears: I like to manually approve comments, so I check “comment must be manually approved” and leave “Comment author must have a previously approved comment” unchecked.
Jetpack Subscriptions Settings: Make sure both “Follow Blog” and “Follow Comments” are checked.
Media
No settings need to be adjusted.
Permalinks
Common Settings: Select “Post name” for the best search engine optimization.
Design Theme-Specific Settings
If you’re using the recommended WP Residence design theme, there are a few settings you’ll need to change/confirm. The many, many other settings are personal preference. Even within the WP Residence theme, your settings may be slightly different depending on which layout you chose to activate. So bring your patience to this step.
Also: Always click “Save Changes” before changing screens.
You’ll find these WP Residence Settings under “WpResidence Options” in the left-hand toolbar or the top toolbar.
 General
Global Theme Settings → Country: Enter your default country.
Logos and Favicon: Upload your logo and favicon images if you have them (the favicon is the little icon that displays next to the webpage name when you have multiple tabs open in a browser).
Header → Media Header Type: I recommend using an image to start. It’s warmer than the Google map default and instantly customizes your site.
Header → Global Header Static Image: If you’re using an image, upload the image here.
Footer → Show Footer Copyright Area: Select “Yes”.
Footer → Copyright Message: Enter “© Copyright [Year Created]. [Your Name or Company Name]”.
Social and Contact
Contact Details: Enter all your contact details.
Social Accounts: Enter any social media accounts.
Map
Map Settings → Google Maps API KEY: This is a bit of a process, but necessary to get Google Maps to work on your site. You’ll need to get an API KEY from Google Maps using your Google Account. If you don’t already have a Google account, you should get one anyway so you can use Google Analytics, Google AdWords, and Google AdSense in the future. It’s free and incredibly useful.
- Go to https://developers.google.com/maps/documentation/javascript/tutorial, click “Sign in” in the top right-hand corner if you aren’t already signed in. That’s also where you can select “More Options” to create an account if you don’t already have one.
- Click the “Get a Key” button in the top toolbar.
- Copy your API key. Go back to your Theme Settings and paste the key in the “Google Maps API KEY” box.
- And now your Google Maps will work. Whew! Moving on…
Map Settings → Contact Page Company HQ Latitude and Longitude: Enter the latitude and longitude of your office location. You can use Google maps to find these.
Design
There are so many interesting ways to change the design of your website: colors, fonts, property page options, etc. When you have some time over the next week, go through these design options and have some fun playing around with them.
None of these settings need to be changed immediately or even at all.
Advanced
No changes need to be made.
Membership
No changes need to be made at this point. If you decide to offer memberships later, you can change the membership settings here.
Search
If you’re not enabling IDX searches on your site immediately, you want to disable the search options so your visitors don’t get error messages when trying to search properties.
Advanced Search Settings: Select “No” for each of the following:
- Show advanced search
- Put search form before the header media
- Use sticky search?
- Use float search form?
Plugin Settings
Most plugins will have their own settings. You can access the settings through the “Installed Plugins” page. Simply select “Plugins”, then “Installed Plugins” from the left-hand navigation bar.
Then click “Settings” under your chosen plugin.
Most of these settings will depend on your personal preferences, but there are a few to quickly check on:
Ultimate Addons for Visual Composer
Scripts and Styles Tab → Optimized CSS: Select “On”.
Scripts and Styles Tab → Optimized JS: Select “On”.
WPBakery Page Builder
Design Options Tab → Use custom design options: Select “Enable”.
Yoast SEO
Features: All features should be “Enabled”.
Adjust Your Menus
There’s one last important setting to address: your menus. Your chosen design theme layout likely already has a main menu. You just need to make sure it’s listing the pages you want included in the menu.

- Click “Appearance” on the left-hand toolbar, then “Menus”
- If your theme doesn’t already have a menu, you can click “create a new menu”.
- Otherwise, you can simply edit the existing menu.
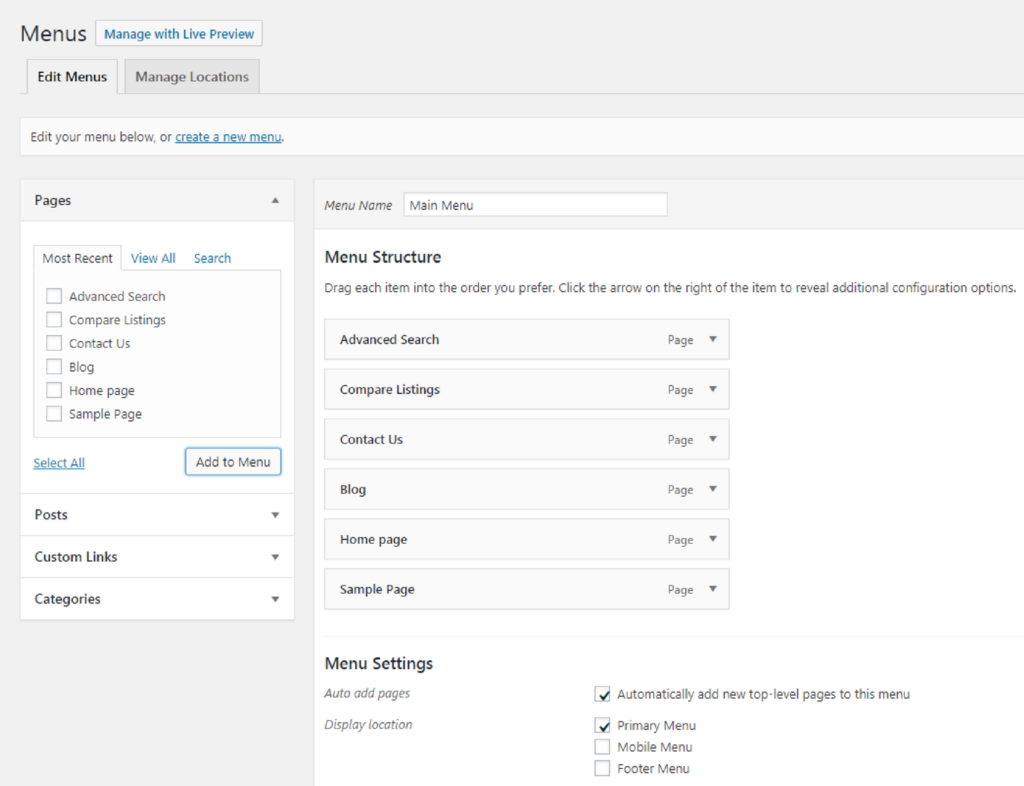
- You can rearrange your menu items if you want them displayed in a different order (like your homepage first) by just dragging and dropping.
- In the settings, check the box to “Automatically add new top-level pages to menu”.
- Check the box for “Primary Menu”.
- Don’t forget to click “Save Menu” before moving on.
You would repeat this process if you wanted to edit an existing footer menu or add one.
Adjusting Widgets
If you’re looking at the front-end of your website (remember, just click on the home icon in the top toolbar to see this working version of your website), you may notice a menu along the right or left-hand side of certain pages (commonly your blog page and properties page). This side menu is called a Widget Area. Your chosen layout might even have a footer widget area. You can completely customize these widget areas as needed.
Just go to “Appearance” in the left-hand toolbar of your WordPress, and choose “Widgets”. This will take you to a screen where you can edit all your widgets.

You have tons of options here and can easily enter a rabbit hole. So keep things simple for now. Just edit or remove the widgets that don’t work for your business, and move on!
Great progress! Your settings and menus are ready to go. Just a few more steps to go!
Step 5: Add/Edit/Delete Your Pages
WordPress and your design theme will automatically create several pages for you during installation, including a Contact Page and possibly a Sample Page.
Your design theme layout may also create sample property listings, blog posts, or other pages. So you need to know how to edit and delete pages, as well as add pages as necessary.
In this section, you’ll get experience adding, editing, and deleting pages.
The amount of time this takes depends on how many pages you need to edit, delete, and create. If you just copy and paste some basic verbiage from this Guide, it could take as little as 20-30 minutes to make sure your pages are set up the way you want them. By the way, if you want some premium ready-to-publish content for your pages, you can order a website text pack on Etsy for under $20!
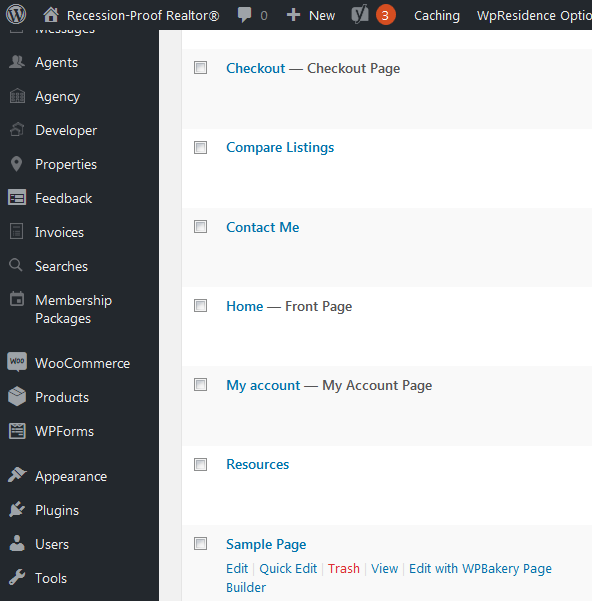
To access your pages, navigate to Pages in the left-hand toolbar, and click “All Pages”.
Delete any Sample Pages or Pages You Don’t Want
If you have a Sample Page, you can delete it by simply hovering over the Sample Page until the pop-up menu appears, then click “Trash”.
 The process is the same process for deleting Posts and Properties. But one warning: some of the elements on your homepage might rely on data from your posts and properties pages. So if you delete those without replacing them with other posts and properties, you may have a blank space on your homepage. You can always come back to this step later, so if you’re uncomfortable deleting items now, not knowing how they will affect your homepage layout, you can always keep these sample pages until after you adjust your homepage in Step 6.
Edit the Contact Us Page
You’ll probably want to edit your Contact Us page. Simply click “Contact Us” in your list of pages (you could also hover over the Contact Us page, then click “Edit” when the pop-up menu appears).
If you work alone, you can rename this page “Contact Me”. Just replace the “Contact Us” in the title with “Contact Me”.
 You will have generic verbiage and a contact form already in the text section. I suggested overwriting the generic verbiage with something simple, but more personable. Something like:
Hi there,
Are you ready to buy or sell? Maybe you would like more information on the local real estate market. Or just have questions about the buying and selling processes.
I’m here to help!
Enter your information in the form below, and I’ll reply as soon as I’m able.
Hate forms? You can always call me directly at (555) 555-5555 or via email at name@domain.com.
Thanks for reaching out!
Feel free to use as much, or as little, of that blurb as you’d like.
Then click “Update” to publish the updated page.
Editing Posts and Properties works the same way. You can either edit those Posts and Properties or delete them completely and add your own Posts and Properties. Either way is fine.
Create an About Me Page
It’s important to introduce yourself to your audience to start building a relationship from the moment they visit your site. And your layout probably doesn’t have an About Me page already created, so let’s add one.
- Click “Add New” under “Pages” in the left-hand toolbar.
- Title your new page “About”, “About Me”, or “About Us” as appropriate.
- Enter your verbiage in the text section.
You may already have an “About Me” spiel you can copy and paste from your Broker’s site, your LinkedIn profile, or any other professional bio source.
If you don’t already have some About Me verbiage crafted, invest some time in creating a killer real estate bio (or even hire a professional writer to craft your bio).
For now, in the interest of having a complete website, you can put a fairly simple coming-soon style message on this page so your audience knows the site is new and you’re working on it. Something like:
Hi there, I’m Michelle.
Thank you for your interest in my real estate services, and welcome to my brand new website!
This website is so new, in fact, that I haven’t even had a chance to write an About Me section yet! In the next few days, I’ll update this page to tell you all about my experience, skills, and resources. It will show you exactly why I’m the best real estate agent for you.
In the meantime, I’d love to learn about you. Are you looking to buy or sell? Do you have any concerns about the local market? Or questions about real estate transactions in general?
Just enter your information in the form below, and I’ll reply as soon as I’m able.
Hate forms? You can always call me directly at (555) 555-5555 or via email at name@domain.com.
Thanks for reaching out!
Again, you’re welcome to use any, or all, of that verbiage for your site.
How to Insert a Contact Form
To add a contact form for your audience to enter their contact information, simply click the “Add Contact Form” button above the text section.
 Click the “Publish” button on the right-hand side to make your new About page go live on your website.
Now we just need to adjust your homepage, then we’ll be ready to launch!
Step 6: Adjust Your Homepage
Depending on your chosen layout, you might have just a few adjustments to make before launching. My recommendation is to make only the changes that are absolutely necessary. A common mistake is to make too many changes, which can throw off the layout. Once the layout is thrown off, it can be difficult to get it back to something that looks normal. Trust your layout to do the heavy lifting for you. Remember, your design theme was created to look good on all devices. Making too many manual changes can cause your site to look strange on phones and tablets even if it looks great on your computer. So only change what you need to.
You access your homepage the same way you access any of your pages (through “Pages” on your left-hand toolbar. When you click on your homepage, you’ll see either the Classic Editor or the Gutenberg Editor, either way, this is your behind the scenes view. To edit, you want to use the Frontend Editor.
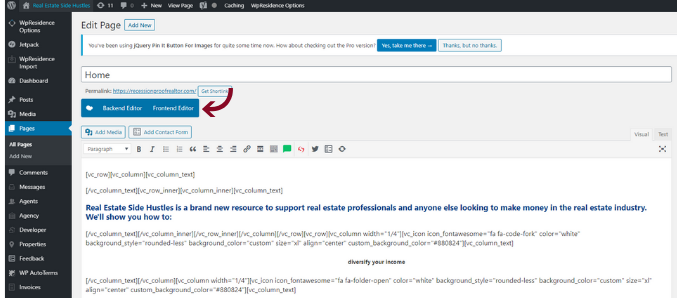 With the frontend editor, you’ll see how your homepage looks on your site, and you’ll be able to edit individual components. You may want to customize the images and text. And maybe make some design layout changes as well.
Honestly, this isn’t the most intuitive editing system, and it does take some time to get used to. You can always hit the undo arrow at the top if you make a mistake. So don’t be afraid to edit and delete items as needed.
The most common edits you’ll need to make are to text and images. Simply hover over an element and click the pencil icon to edit.
You’ll find that some of your homepage elements are automatically populated by information on other pages, properties, and posts. For example, you may have a section on your homepage that shows your recent listings or recent blog posts. Those are great because they automatically update every time you publish a new blog post or property listing.
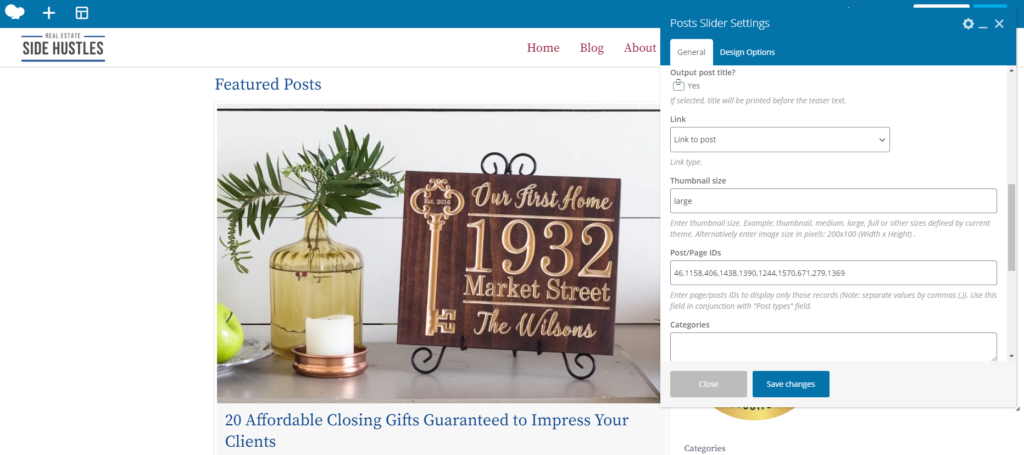
You might also have a “featured” listings or posts section. This allows you to manually choose which items you want included in the section (using the post/page IDs, which you can find by going to Pages or Posts on the left-hand toolbar in WordPress to view all pages or posts. You’ll see the ID on each line item). As you hover over each homepage element, you’ll see editing icons pop up, including a pencil icon for editing, a copy icon for cloning, and an x for deleting. If you click on the pencil, you’ll be able to make adjustments, including which posts or page IDs are included in the feature. Here’s an example of the editing screen for a Featured Post section from the homepage of this site:
 Again, I recommend changing only the items that need to be changed to suit your business. Generally, the closer you can stay to the original layout, the better your site will look.
One quick note about using images on your website: you need to be careful about copyrights. You can’t just use any image you find on Google. You need to have the legal right to use the images on your website. But that doesn’t mean you have to purchase all your images. There are some resources for finding royalty-free images online.
Whew! I know that’s a lot of work, but the hard part is over, and you’re ready for launch!
Step 7: Launch!
To officially launch your site, we just need to turn off the Bluehost Coming Soon Page in the Settings, then tell Bluehost to launch your site live!
Turn Off the Bluehost Coming Soon Page
- Click “Settings”, then “General” in the left-hand toolbar.
- Scroll down to the Bluehost Coming Soon Page Section, and select “Off”. Then click “Save Changes”.
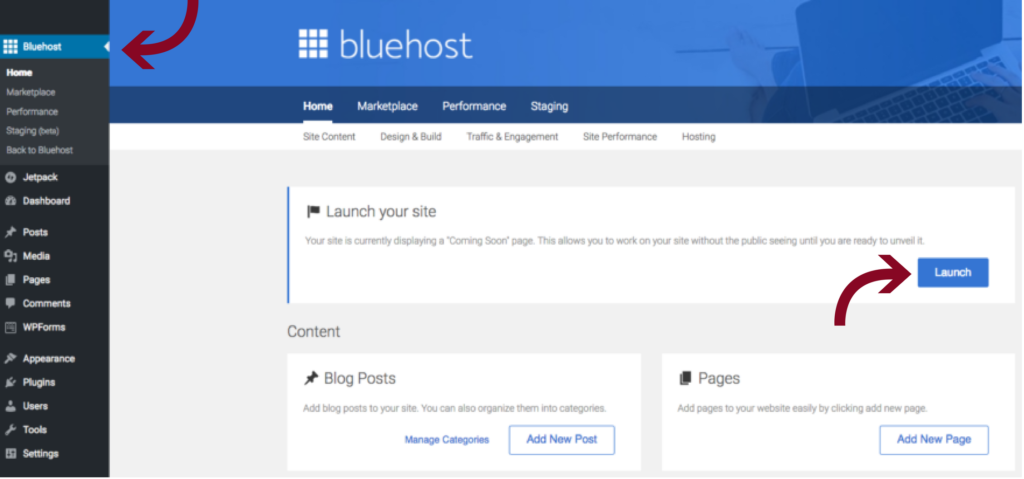
Launch Your Site
Last step! Click on “Bluehost” in the left-hand toolbar, then click “Launch” to make your site go live.
 DONE!
DONE!
Congratulations!!! You just built your own real estate website! You saved yourself thousands of dollars and completed a major project most business owners are too scared to tackle on their own. I know it’s not exactly easy to build a real estate website, but you’ve done it.
What Now?
Your new website is perfectly presentable and will make a professional impression on your online visitors. But you might want to consider taking a few more steps to optimize your site for maximum effect.
Over the next week or so, try to find some time to get acquainted with the features of your new website and customize it to better represent your unique brand.
To help you with this, I created a free Post-Launch To-Do List. It’s a handy checklist of ways to customize and optimize your new site. My recommendation is to work through this list in the next week or two. The longer you wait to tackle the list, the less likely you are to actually do it. Just enter your contact info below to get your free checklist delivered to your inbox.
Spread the Love!
If you found this completely free guide on how to build a real estate website helpful, give it a quick share! Just click any (or all!) of the social media share buttons on this page to spread the love.